3D Visualisation Service – The Process Explained
I thought it would be interesting to write a post explaining the process of how I create 3D visuals for my clients; from the moment I’m commissioned to undertake a new project, to the creation of the final presentation.
It’s important to note that ALL of my commissions are initiated via email and all subsequent correspondence is usually conducted via email. This is predominately because most of my client-base is located in UK Mainland. If I need to clarify something pretty urgently then I’ll pick up the phone, regardless as to the client’s location. So there you have it; I’ve only met 1 or 2 of my clients in person and the fact that I may be located in a different country is completely irrelevant. I’m still able to produce 3D visuals that meet with client expectations and within the time-frame specified. A testament to the greatness of the digital age!
Before I begin the process of creating 3D visuals, I need to know the time-frame for delivery – I’m going to be honest, the longer I have the better. No one wants to throw together a ‘rush job’ in 2 days. Unless it’s a very simple design/space, which is rarely the case. I usually quote a time-frame of 10 days (I am however, open to negotiation, depending on my workload). This includes the construction of the 3D model, application and/or creation of textures, sending test renders to the Designer for approval, amending the 3D model if necessary and setting up the model to process the final renders.
Ok, so here’s the process.
1. Gimme a floor plan. I NEED a floor Plan! Give it to me!
This is the first piece of information that I need and the most important. The floor plan MUST include dimensions and should incorporate a furniture plan. It doesn’t need to be to scale or even expertly drawn. A scribble on a dog-eared piece of paper will suffice, as long as it is legible and includes all the necessary information.
A floor plan contains a wealth of information and I refer to this frequently as I begin the process of constructing the 3D model (walls, windows, location of doors etc.). The most common omissions? Ceiling heights, window height/designs and door heights! But it’s no drama, if the Designer isn’t sure of these various heights then I’ll use standard dimensions.
Don’t forget, I’m constructing the 3D model from the ground up, using real world dimensions and therefore I need as much detailed information as possible. Why? The more information I’m given, the more accurate and realistic the overall space will look in the final 3D visual.

A dog-eared floor plan will suffice, even one drawn on a napkin.
2. Furniture
The placement of furniture should be included in the floor plan and can be represented as ‘blocks’. I don’t expect Designers to spend half a day drawing furniture onto a floor plan that resembles the actual real-life shape. That’s just silly! But what I do need is images. Lots ‘n’ lots of images of the furniture to be used in the design. The more images the better! So, if there’s a specific bed, sofa, chair or table that’s going to be included in the design, send me links to websites that showcase these or JPEGS. Website links are preferable because they usually include dimensions. Again, I NEED dimensions. Kinda self-explanatory, right?!
3. Fabric/Wallpaper/Paint/Flooring
Adding textures and materials to a 3D model (including walls, floors and fabrics) is a crucial part of the process – accurate depictions of the various real-world finishes ensures that the final 3D visual is as realistic as possible. If paint, wallpaper and fabric will be included as part of the design, then I need images or website links to give me an idea of colour, pattern and finish.
I import JPEGS into my 3D model of all the various textures and materials to be used in the design. If there are no website links available, then I ask the Designer to take a photo (if possible) from sample books. The photo needs to be taken at ‘plan view’ with no perspective or shadows. However, if the photo I’m given isn’t suitable or needs to be adjusted to my liking; I can do a little bit of image editing in Photoshop or create the texture from scratch.
4. Lighting
I need to know where all lighting will be located in the space and its design. For example, if recessed ceiling lighting will be incorporated, then I need to know how many to include. If lamps or pendant lighting will be used, then yep, you guessed it, I need images or website links of these.
5. Window treatments
Blinds? Roman or slatted?
Curtains? Pencil pleat or Eyelet? Drawn or closed?
I need to know which type of window treatment and its finish/fabric (including the type of curtain pole, if appropriate).
5. Physical Environment
I usually decide on the physical environment lighting (daylight, direction of sun, evening lighting) when I create test renders, to establish which physical environment setting is more complimentary to the scene/angle being rendered. I select the best angles within the space that illustrate various design elements effectively but ensure the image is still visually captivating. My choice of physical environment settings and camera angles are rarely changed by the client.
6. Test Renders
Once I’ve completed the construction of the 3D model, I’m ready to commence test renders. This is the exciting bit! I provide the client with a draft presentation that includes the test renders (different angles, if requested) and a plan view of the space (to scale). I decided long ago to present these images on an A3 sized PDF document – I felt they provided more visual impact this way, instead of individual images and I’ve never had any complaints from my clients. Sometimes at this stage of the process, the Designer may have a change of heart regarding a particular design element, fabric, paint colour or piece of furniture. It’s at this stage that they need to communicate any changes.
7. Final Presentation
Once I receive final approval from the Designer, I commence the final renders.

Once the 3D visuals have been fully rendered, I then carry out post-processing via Photoshop to enhance the overall image and then send the final A3 presentation to my very happy client!
It’s seems like a time-consuming and resource intensive process, when it has been listed like this but it really isn’t! As long as I receive all the necessary information the entire process is actually quite painless! Plus, nothing beats the sheer delight and positive feedback from my very satisfied clients: it makes my job so worthwhile. Here are a few final presentations in all their photo-realistic glory.

Bedroom Room Set for Grand Designs Live 2014

Dining Room Set for Grand Designs Live 2014
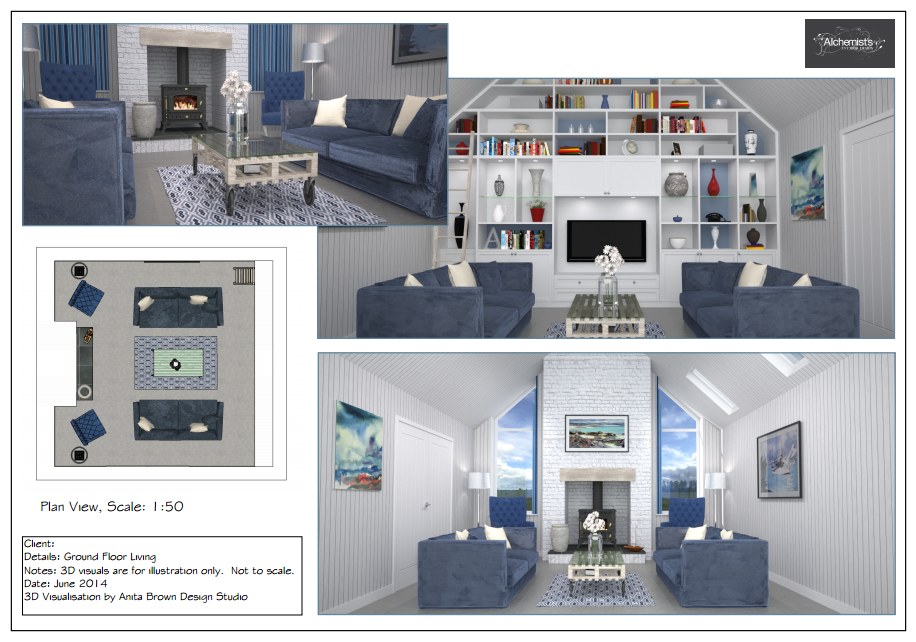
A fresh, crisp and modern living room design. Where I can (or when I’m allowed), I always try to include an ‘arty’ close-up shot!

Modern Bathroom Design


14 Comments
It’s beautiful!
LikeLiked by 1 person
Thank you! 🙂
LikeLike
Wow…that is quite impressive and a great eye-opener when it comes to visualization and sketchup modelling!!!
LikeLiked by 1 person
Thanks!
LikeLike
Good presentation but prefer if it is done on audio visual too.
LikeLiked by 1 person
I’m not sure what you mean! Are you referring to my animations?!
LikeLike
Excellent article Anita.
I use Autocad for modelling our components with very limited rendering ability though.
Your final visualisations look great.
LikeLiked by 1 person
Hi John! Thanks, I’m thrilled that you enjoyed it! AutoCAD is a powerful tool with an incredibly steep learning curve! I find that SketchUp meets most of my needs and its intuitive platform is so user friendly!
LikeLike
Very impressive 3D visuals and thank you for a great article too!
LikeLiked by 1 person
Hi Kerry, thank you 🙂 I hope you found the post a useful insight into the process of creating 3D Visualisations.
LikeLiked by 1 person
Hi James, thank you for your interest in my work. I’ll drop you an email providing more information on my 3D Visualisation service.
LikeLike
[…] I started using SketchUp (and Maxwell Render) for interior design purposes, so that Interior Designers could convey their design proposals to clients. as accurately and as realistically as possible. Read more about my 3D visualisation process here. […]
LikeLike
[…] 3D Visualisation service brings me into contact with Interior Designers aplenty, so this editorial would also benefit the […]
LikeLike
[…] http://anitabrowndesignstudio.com/2014/07/19/3d-visualisation-service-the-process-explained/ […]
LikeLike