3D Visualisation – FAQs
I receive a lot of emails from peeps considering a career in 3D Visualisation or who are new to the industry. They ask me lots of general questions that range from useful resources when trying to learn this skill, to details on the software I use and everything in between.
So, without further ado, take a seat and make yourself comfortable as I address some of the most popular questions I receive and hopefully provide you with some useful advice and tips regarding this amazing, niche industry.

The beauty of being a tech geek is that I can make my own GIFs. I know.

I’m always asked about hardware considerations.
Let’s get something straight: photo-real images are greedy wee suckers. They want and NEED lots ‘n’ lots of RAM. So if you’re thinking of kicking off an awesome career in 3D Visualisation, then you need to invest in decent hardware. The memory required to produce detailed 3D models alone (especially if it’s a large model with LOADS of smaller detailed models) requires an adequate amount of RAM, never mind the rendering software on top of that.
I’m far from an expert when it comes to the IT side of things but apparently the more Cores you have the better. At present I’m still using my laptop (HUGE no-no!) for all of my 3D Visualisation work and I gotta tell ya, I can almost hear its grunts and groans when I throw a RAM intensive project at it. Plus, a certain number of rendering effects need lots of RAM (displacement, for example), there’s no getting away from it, you need to have the right tools in order to get optimum results.
If you don’t have enough RAM, your system will run much slower or worse, it could continually crash. Projects in the 3D Visualisation field are always needed yesterday, tight timescales are (unfortunately) a reality, therefore you need a machine that is up to the job.
Maxwell Render offers a useful Benchwell facility, where you check the performance of your computer under controlled conditions. It also provides a useful comparison table of other Benchwell tests and their respective hardware configurations. Mighty handy.
So basically, do your homework. Read, research and read some more. If necessary, speak to IT professionals and get advice on the best spec available to you at your set budget. Or explore the option of getting a custom workstation built for all of your 3D modeling/rendering needs.
You won’t regret it.

If you asked twenty 3D Visualisers what software they used in order to create 3D models and photo-real images, chances are you’ll be provided with a colorful array of answers. And there’s no wrong answer. Personal preference will usually dictate which software you eventually choose. However, I would recommend that anyone considering this field, should trial a few different 3D modeling applications and rendering engines before making a final decision. Makes sense, right?
I use SketchUp Pro. I’ve previously ranted and raved about how awesome SketchUp is. Click here to read more.

I might have created an amusing cartoon character of SketchUp. Ok, I DID. But it was only out of love!
If you are new to the 3D modeling world, SketchUp will undoubtedly ease you gently into this minefield. Don’t underestimate the power and functionality of SketchUp (there’s a little bit of snobbery in the 3D Visualisation game, when it comes to certain software applications). I’ve had people from the industry ask me what 3D modeling software I use to create my 3D visuals and they are astounded when I tell them that I use SketchUp.
Plus, there’s an awesome SketchUp community out there, brimming with people who offer loads of support and advice for fellow SketchUp-ers. The best forum has got to be SketchUcation. It’s full of discussion boards pertaining to 3D modeling/rendering and it’s home to a ridiculous number of knowledgeable people who would be considered experts in their field.
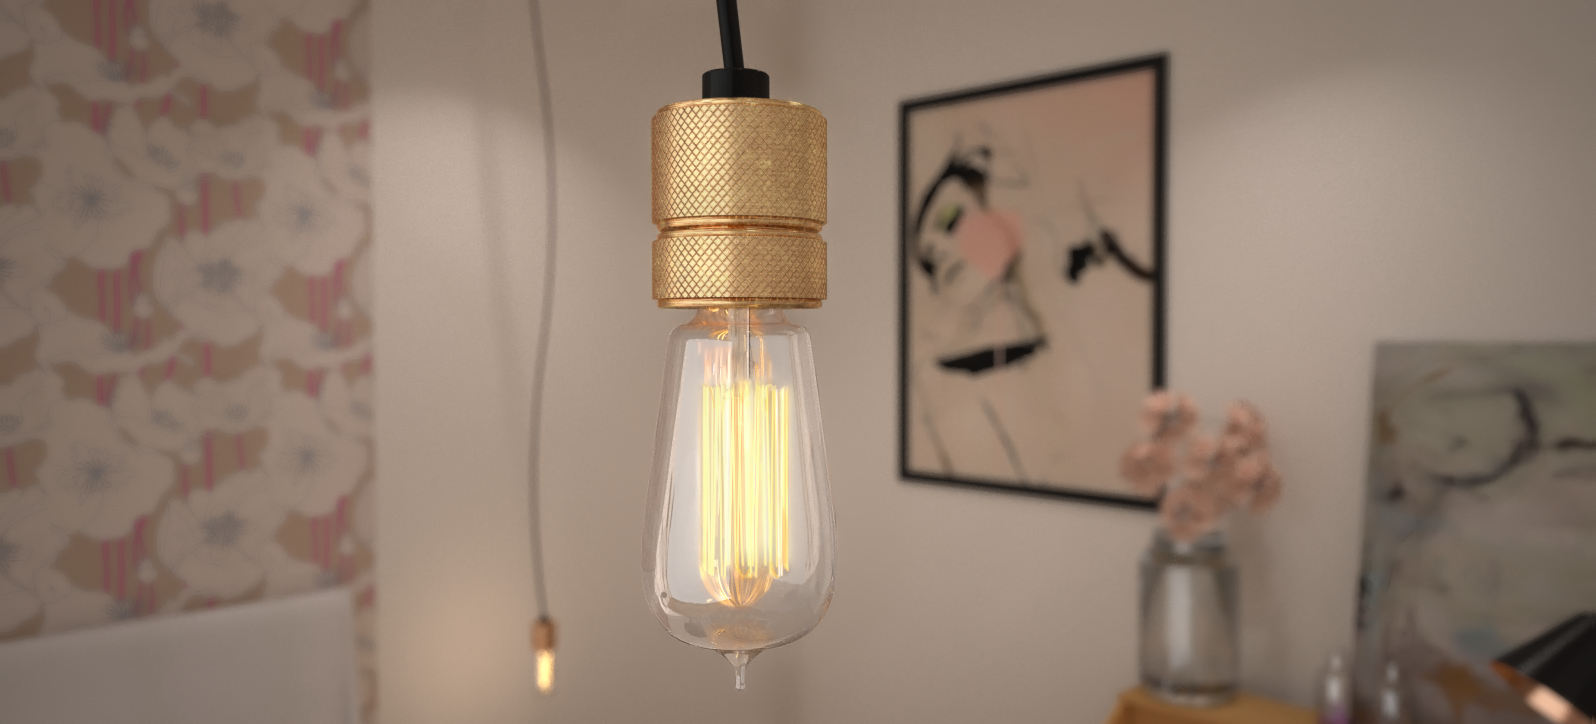
Next up, is Maxwell Render: my rendering engine of choice. I use the SketchUp plugin but also have the full Maxwell Render Suite. If you’re serious about creating photo-real 3D visuals that are of a high standard, then you’ll want to avoid the free version. As a beginner, it’s useful for familiarising yourself with the interface but an upgrade to the next level is a must.
I chose Maxwell Render because of its seamless and user-friendly interface with SketchUp and more importantly, I find that its photo-realism is hard to beat.
This bad boy was created using SketchUp Pro and Maxwell Render. The same 3D visual is used as a cover image by Maxwell Render across all of their social media platforms. If it’s good enough for them: it’s good enough for me!
You can read more about my Maxwell Render workflow here, when I was asked to undertake a ‘Making of’ for Maxwell Render.

There’s no easy way to say this, so I’m just going to come right out with it.
The learning never stops.
Yep, that’s right. It’s taken me 2 years of constant self-teaching to get to my current standard and I’m by no means an ‘expert’. Every time I undertake a commission I learn something new. This is why it’s so important to spend time on personal projects too – you’re able to refine, sharpen and tweak your skills, processes and techniques.
For example, the image below was a personal project. This single image helped me to better understand scene-setup in order to achieve a visually captivating, photographic image (think glossy Interiors magazine), it enhanced my knowledge of post-processing AND I was able to fine-tune my technique at creating fur.
PRACTICE, PRACTICE, PRACTICE!

There is an abundance of online resources available to assist in self-teaching 3D modeling/rendering. My go-to would have to be YouTube. There are also a zillion forums, groups and publications on the subject.
You want to learn 3D Visualisation? Then get your hands dirty! You have to take the leap!
Download the software, READ and RESEARCH topics on 3D modeling/rendering (rinse and repeat), speak to others in the industry, join forums and soon you will start to see the results.
I PROMISE.

Understandably, a lot of peeps don’t always appreciate that 3D Visualisation isn’t just about grasping the technical skill required to produce a 3D model and then make it look ‘real’. 3D Visualisation also requires an understanding of lighting, photographic techniques including composition, image editing (also known as post-processing) and it also requires a certain creative edge.
I’ve researched photography to aid my understanding of what makes a ‘good’ photo.
I’ve studied the 3D visuals of highly regarded 3D Artists (and their workflow) to help improve the visual aesthetic of my 3D visuals to (hopefully) push them up to the next level.
And I’ve studied the real life attributes of materials to get a true sense of their reflections etc. so that I can replicate them as closely as possible in my 3D visuals. Yes, on any given Saturday night you may witness me studying water in a glass, or observing the reflective qualities of a sink…living on the edge, people.
Living. On. The. Edge!

The inclusion of Photoshop (or any other image editing software) is crucial to the 3D Visualisation workflow. It took me a while to appreciate this (one of the perils of self-teaching is that you’re usually blissfully unaware of certain techniques until you accidentally stumble upon them), however now that I’m fully aware of its benefits, I can safely say that Photoshop is used (on some level) in every single commission I undertake.
The die-hard ‘raw renders only’ club will most likely be doing this right about now.

Like it or not, post-processing allows you (the 3D Visualiser) to enhance a raw render. This can be something as simple as correcting the colour balance, adjusting the exposure, exaggerating highlights or reducing noise in a 3D visual. I should add however (to pacify the die-hard ‘raw renders only’ club), that it’s deemed good practice to ensure all of the necessary scene attributes are created in the 3D model/final render. From experience, if you try to add/remove/correct actual aspects of a scene’s attributes/materials using Photoshop, sometimes the ‘photo-real’ result is less convincing.
Although, Photoshop is also essential when creating or editing textures for inclusion in a 3D model (particularly bump maps), so either way, becoming familiar with image editing techniques is a must.

I provide 3D Visualisation services primarily to the Interior Design, Wedding Planning and Events industries, however I’ve also created 3D visuals for business marketing/promotion purposes. Architects would use 3D Visualisation for exterior renders to illustrate the architectural attributes of a proposed building design and product designers would also avail of 3D Visualisation to get an accurate illustration of their designs (also useful for online portfolios).
If you are reading this and are considering dipping your toes into the shark infested glorious world of 3D Visualisation and feel daunted by the learning curve ahead – DON’T BE! We all have to start somewhere, the best advice I can offer is to give yourself time, set yourself goals and enjoy this process of learning and discovery.
If you have any more questions, drop ’em in the comments below and I’ll do my best to answer!
![]()


Start the Conversation!